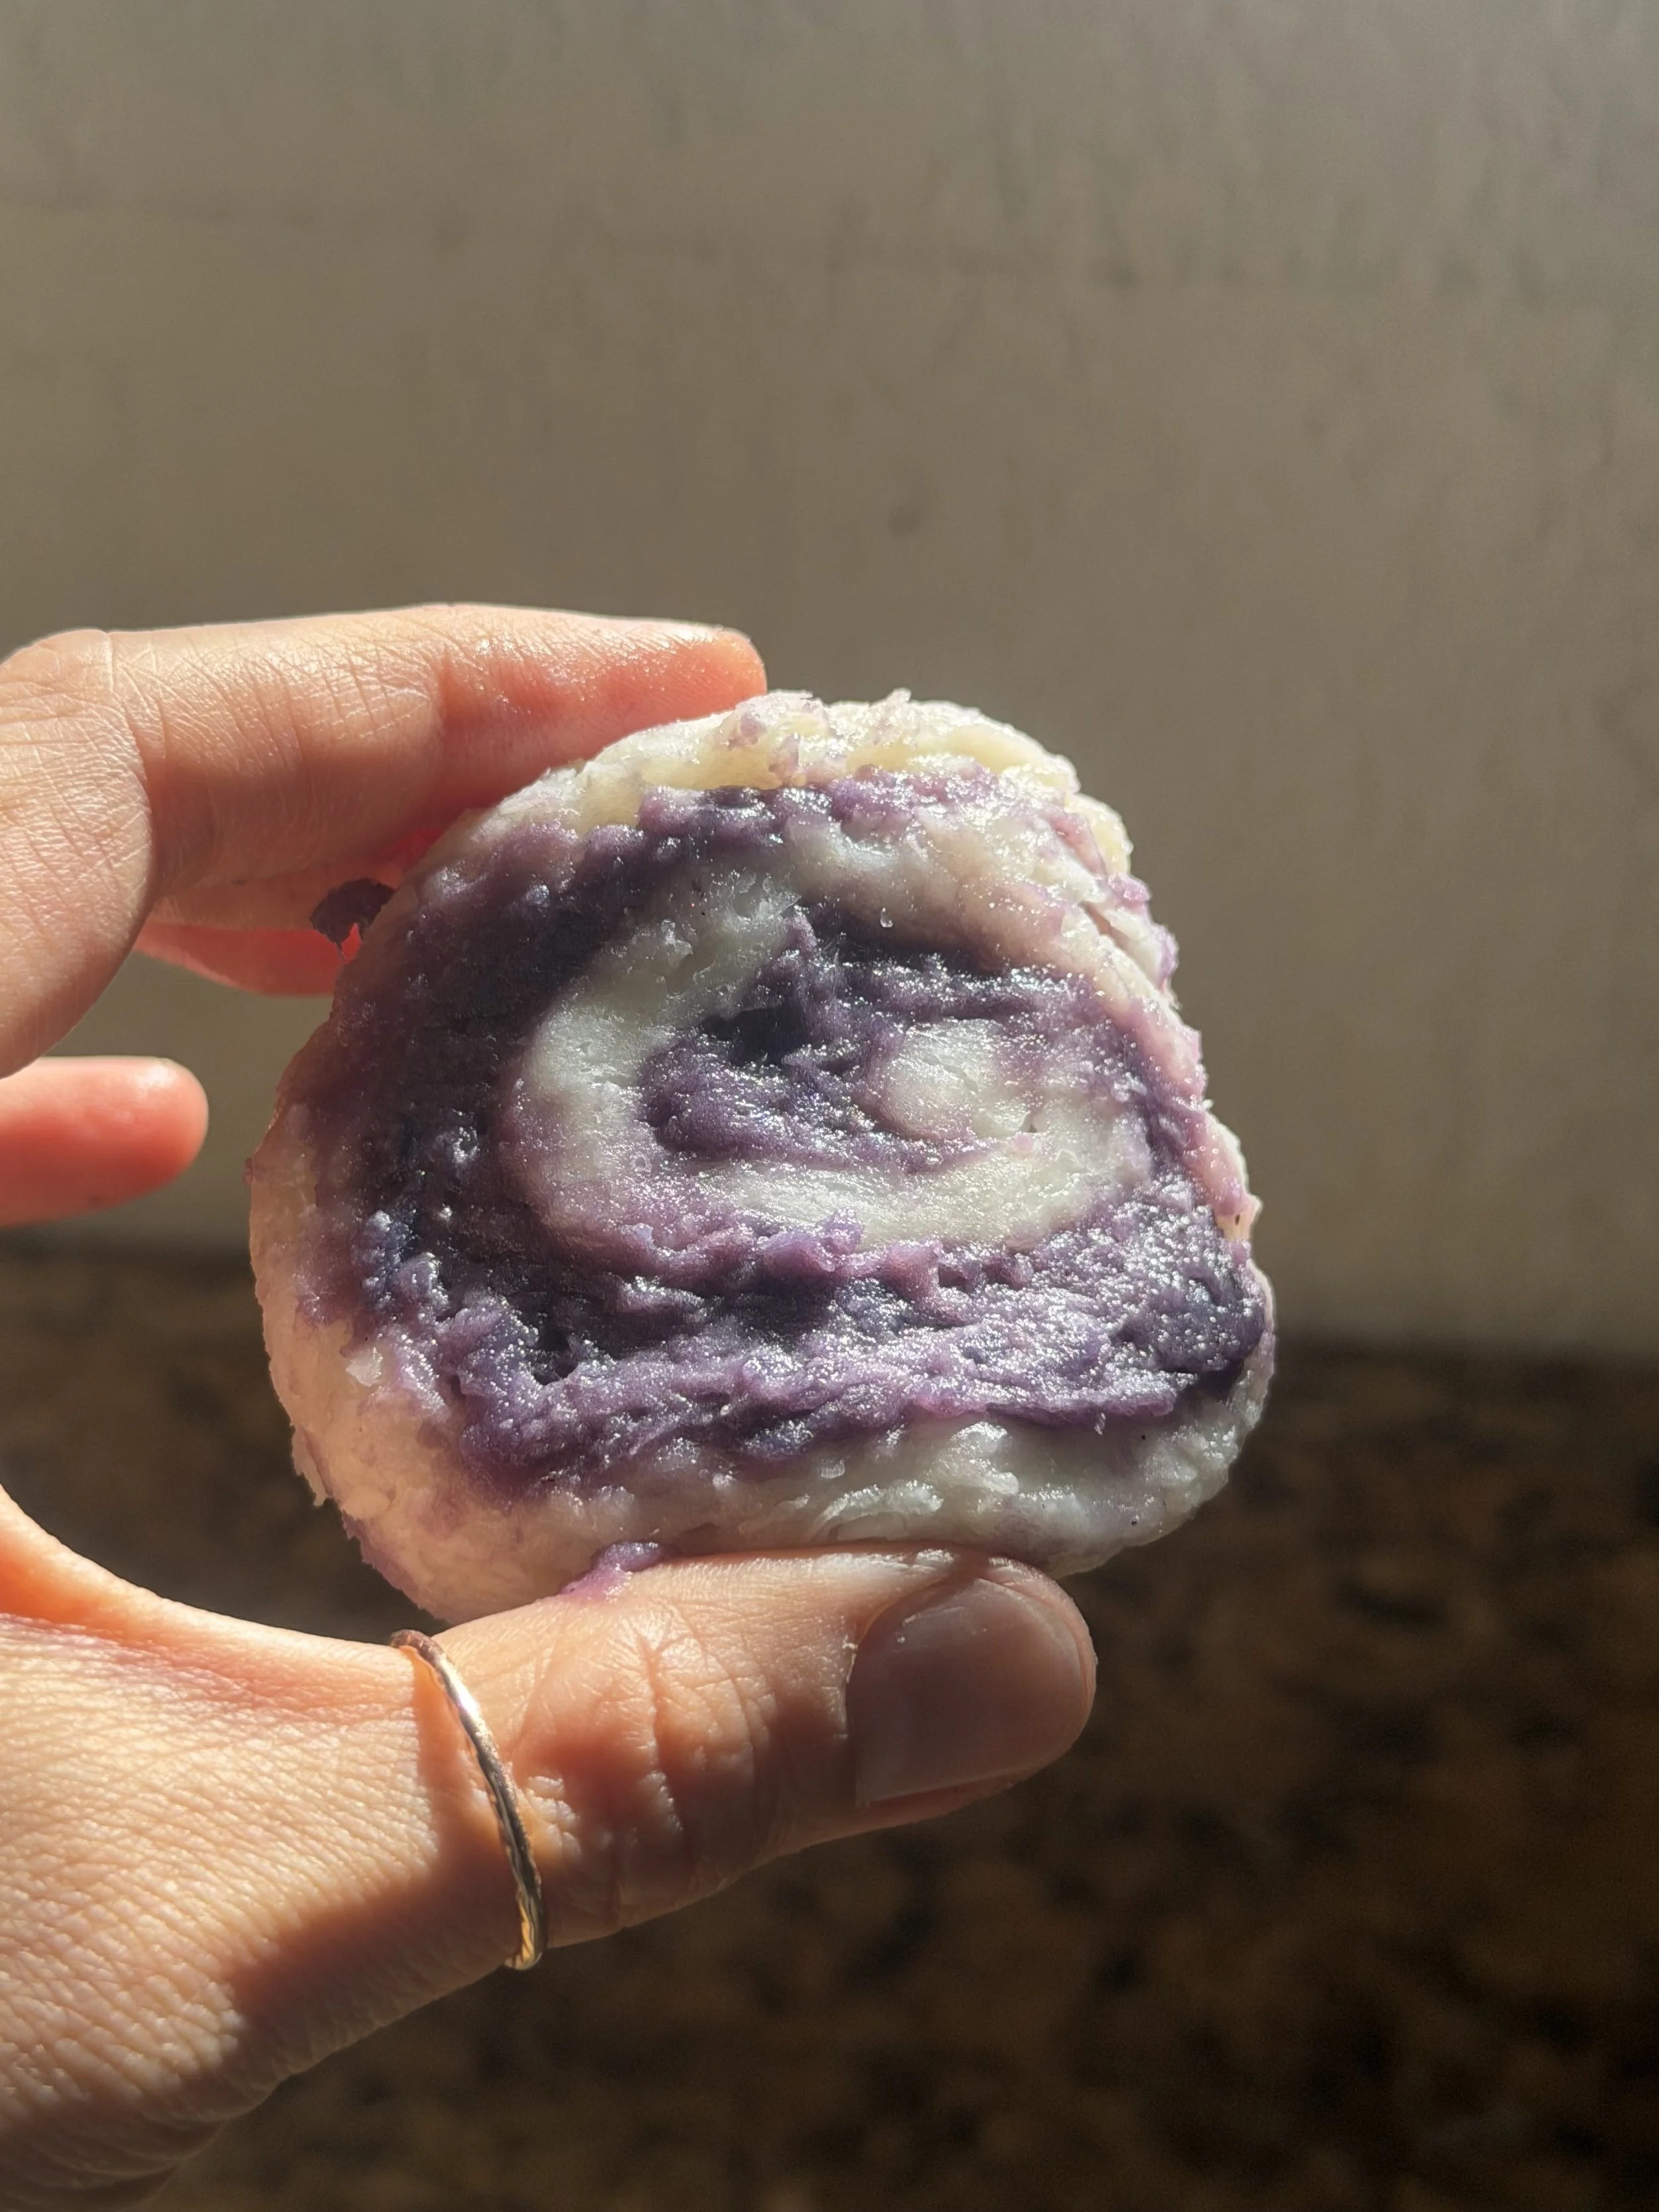
Gut-Nourishing Purple Sweet Potato Mochi Roll
This gut-nourishing Purple Sweet Potato Mochi Roll is naturally gluten-free, refined sugar-free, and filled with antioxidant-rich purple sweet potato. A soothing, anti-inflammatory treat perfect for digestion and eczema-prone kids—soft, chewy, and sweetened only by whole foods.
Soft, chewy mochi filled with creamy purple sweet-potato goodness—made with only whole-food ingredients. As always with gut health, skin health, eczema and sensitive stomachs in mind.
INGREDIENTS
For the Mochi Dough
1½ cups sweet white rice flour — 200g
(If making your own from organic rice, see below.)100% coconut milk — 180 ml
A splash of water as needed — 15ml
1 tbsp grass-fed tallow*
A pinch of sea salt
No sugar in the dough
(Optional: drizzle raw organic honey* on the slices after rolling.)
For the Filling
2 small purple sweet potato — approx. 250 g raw (about 200 g cooked/peeled)
1 scoop grass-fed Be Well By Kelly Vanilla Protein* (code MUMWITHABUN)
Splash of coconut milk (if needed)
For Dusting
Desiccated coconut (optional)
(If coconut-allergic: use lightly toasted glutinous rice flour.)
How to Make Glutinous/Sweet Rice Flour From Scratch (Using Organic Rice)
While mochiko is convenient and traditionally made from glutinous (sticky) rice, you can create a similar flour at home to ensure it is easy to digest & lower in arsenic / pesticides:
Measure 1½ cups organic rice (this yields roughly the same amount of flour).
Soak & Sour for 4-6 hours. (Follow Steps 1-4 here)
Rinse and drain well.
Spread the rice on an organic cotton cloth and let it air-dry completely. (30 min.)
Grind in a high-speed blender until it becomes an ultra-fine flour.
Sift to remove any coarse grains. Grind remaining coarse grains.
Note: Homemade rice flour won’t be as sticky as true glutinous rice flour, so your mochi will be slightly less stretchy; even more nutritious, delicious, and a bit firmer.
METHOD
1. Prepare the Purple Sweet Potato Filling
Steam the sweet potato in a double steaming pot, for 30 min, until completely mashable.
Peel and mash the potato until smooth.
Mix in scoop of Be Well By Kelly Grass-Fed Vanilla Protein* — adds a touch of sweetness via the ground up organic monkfruit + gut-healing support via naturally occurring collagen!
If the sweet potato mash feels dry, add a small splash of coconut milk.
Set aside to cool.
2. Make the Mochi Dough
In a heat-safe bowl, whisk together:
1½ cups sweet white rice flour
180 ml coconut milk
pinch of salt
The mixture will be thick and sticky.
Line the bowl with non-toxic parchment paper (this makes the kneading step easier).
Pour mochi batter into lined bowl and cover with parchment paper
Place in your double-steam setup and steam for 30 minutes, or until the dough is shiny, translucent, and bouncy when pressed.
Carefully remove from the steamer. Let it cool just enough to handle.
3. Knead & Shape the Dough
Melt tallow into the dough while it’s warm.
Oil your hands.
Using the parchment paper as your work station, stretch the warm mochi, fold it, press, knead and stretch again. Repeat until it forms a soft, smooth dough ball.
4. Roll & Fill
Spread & roll the dough into a rectangle about 1/8 inch thick over parchment paper.
Tip: If it’s too sticky, sandwich the dough ball between 2 parchment papers before rolling it.Dust your work surface / separate parchment paper generously with desiccated coconut
(coconut-free option: arrowroot flour).Lay the mochi sheet on top of the dusted parchment paper.
Spread the purple sweet potato filling on top of the mochi sheet.
Option: sprinkle a dash of cinnamon at this step to make it a “cinnamon roll” (;
Starting from the edge, roll tightly into a log.
Use parchment paper to further tighten the log.
5. Slice & Serve
Use unflavored, plastic free dental floss to slice clean pieces.
Serve immediately or refrigerate in airtight glass container up to 3 days.
My favorite way to reheat this is to air fry it at 350°F for 5 minutes the outside gets perfectly crispy and the inside gets beautifully chewy again!
Optional: drizzle raw honey on each slice just before serving for a naturally sweet finish.
STORAGE
How to Store Your Purple Sweet Potato Mochi Roll
Mochi is at its softest on the day it’s made, but this roll keeps beautifully with the right care:
Room Temperature
Not recommended, as fresh sweet potato filling can soften too much and affect texture.
Refrigerator (best option)
Store the sliced mochi roll in an airtight glass container.
Best enjoyed within 2–3 days for optimal chewiness and freshness.
If the outer layer firms up slightly in the fridge, you can let it rest at room temp for 10–15 minutes before eating.
Freezer
Freezing is possible but not ideal—the texture becomes more brittle.
If you must freeze: wrap each slice individually and store for up to 1 month. Thaw in the fridge overnight.
*Ingredient Note & Discount Code
If you’d like to make this recipe exactly the way I do, the grass-fed vanilla protein, grass-fed/finished tallow and raw organic honey I use are all linked in the post.
Save when opting for these gut-friendly staples by using code MUMWITHABUN— a small yet impactful way to support gut health / those wanting the cleanest, most nourishing ingredients.
Purple Sweet Potato Mochi Swirl - A dessert that actually loves your gut.
Why this dessert is a “healing food”
1. Sweet Rice Flour
(especially if soaked & soured / if you make your own)
Naturally gluten-free and low gut irritant
Rich in prebiotic starches (resistant starch forms when cooled → supports gut bacteria and butyrate production)
Soaked/soured rice → reduced phytic acid, easier digestion, enhanced mineral availability
Provides steady, slow-burning carbs when paired with fats + protein
Healing benefit: gentle on digestion, supportive of gut bacteria, easy for sensitive tummies (kids + eczema-prone included).
2. 100% Coconut Milk
Contains MCTs → rapidly absorbed, supports mitochondrial energy, antimicrobial
Supports the gut lining with soothing fats
Stabilizes blood sugar when combined with carbs
Healing benefit: nourishes the gut lining and helps maintain hormonal and metabolic balance.
3. Grass-Fed & Finished Tallow
Rich in fat-soluble vitamins (A, D, K2)
Provides stable saturated fats that reduce blood sugar spikes
Anti-inflammatory profile when from a grass-fed source
Healing benefit: supports hormone regulation, skin barrier repair, and immune support!
4. Okinawa / Purple Sweet Potato Filling
High in anthocyanins → potent antioxidants for brain and skin health
Contains soluble fiber for digestion + microbiome health
Low glycemic when combined with fat/protein
Healing benefit: antioxidant-rich, gut-soothing, nutrient-dense carbohydrate.
5. Grass-Fed Protein Powder (Be Well By Kelly)
Adds complete protein to balance the carb content
Slows glucose absorption → keeps this dessert blood-sugar-friendly
Collagen-rich → supports gut wall repair (which is literally made of collagen) - so important for my eczema friends!
Chemical-free (this protein powder is extracted with heat & water only - like bone broth!)
Healing benefit: stabilizes blood sugar, supports gut repair, helps satiety.
6. Raw Honey (optional drizzle)
Contains vitamins, minerals, enzymes, polyphenols, and natural antimicrobials
Helps satisfy sweetness cravings while providing trace nutrients
Healing benefit: functional, whole-food sweetness — not to mention it’s time tested medicinal properties.
7. No Refined Sugar, No Additives, No Seed Oils
This is where the “healing dessert” concept comes to life.
By removing the major irritants (refined sugar + seed oils + gums + fillers), you find in most desserts (i.e. soy milk, refined sugar, etc) we eliminate the typical inflammatory dessert triggers and swapped them for gut health supporting ingredients. Our ancestors would be so proud.
Gut-Friendly Korean Yakbap (No Refined Sugar, No Seed Oils, Traditional Version)
This nourishing traditional Yakbap skips the refined sugar, seed oils, and overheated honey—giving you a glossy, chewy, low-inflammatory treat perfect for kids with eczema or anyone on a gut-healing journey.
Traditional Korean sticky rice dessert redone without soy, inflammatory seed oils, or refined sugars.
This version is everything you want from Yakbap—subtle-y sweet, comforting, medicinal—but rebuilt for gut health.
YakBap is traditionally sticky & quite sweet—but most modern versions rely on refined sugar, seed oils, soy sauce, artificial “honey,” and over-cooked syrups that strip nutrients and spike inflammation.
What Makes This Yakbap Anti-Inflammatory & Gut-Friendly
Raw Organic honey added after the rice cools below 110°F (preserving enzymes + vitamins + minerals + medicinal benefits)
No seed oils — using grass-fed tallow instead
No refined sugar — levels up for healthier blood sugar levels and eczema-prone skin
Coconut aminos instead of soy sauce — supporting hormone + thyroid health
Sprouted pumpkin seeds instead of nuts — allergy-friendly and mineral-rich
With Safety Tested 100% White Rice &/or Organic Germinated Five-Color Rice — easier digestion + better nutrient absorption
White Rice or Germinated Rice?
Choose your path.
Traditional YakBap uses white rice. It’s soft, comforting, and easy to work with.
But if you want:
lower inflammation
better digestion
more minerals
steadier blood sugar (major for eczema)
using this organic germinated rice is a legit upgrade to consider. Since the grains are sprouted, they become easier to digest, lower in phytic acid, higher in antioxidants, and gentler on sensitive tummies—without losing the chewy Yakbap texture & rich nutty flavor.
Rice Options for This Recipe
100% White Rice — classic feel, softest texture + better for active stomach flare up’s
Organic Germinated Rice — highest nutrient density + best overall gut support
70/30 Blend of the above — white/germinated
INGREDIENTS
Rice
1 ½ cups rice (see rice options above)
Warm filtered water (for soaking/souring)
1 tbsp raw apple cider vinegar or fresh lemon juice (for souring white rice - ok to skip this ingredient if you go with the germinated rice)
Warm Syrup Base (NO honey yet)
1.5 tbsp coconut aminos
1.5 tbsp grass-fed tallow
(code MUMWITHABUN)½ tsp ceylon cinnamon
⅛ tsp sea salt
Raw Honey
3 tbsp raw organic honey — drizzled at the end
Add-ins
¼ cup sprouted pumpkin seeds
5 chopped jujube
100 g diced & steamed Okinawa sweet potato (optional)
METHOD
1. Soak & Sour
(Improves Texture + Digestion)
Rinse rice well.
Soak 4–6 hours with warm water + ACV/lemon (if using white rice).
After soaking, rinse until the water runs clear.
Drain well—drier rice = better steaming.
2. Prep Your Steamer
Soak Jujubes in baking soda water (15 min) & rinse/scrub clean under filtered water.
Peel jujube fruit off the seed & throw the seeds into the pot.
Add 2 inches of water to the bottom pot chamber.
Bring to a steady simmer (not a rolling boil).
Line the steamer basket with a damp organic cheesecloth.
3. Initial Steam (just the Rice)
Spread soaked rice no thicker than 1.5 inches.
Steam based on rice choice:
Rice Type : Steam Time
100% White Rice: 60 min
70/30 Blend: 90 min
100% Germinated Brown Rice: 110 min
Rice should be chewy-soft, not firm.
Let rice cool until warm—no longer hot.
4. Make the Unheated Honey “Syrup”
Whisk together:
coconut aminos
cinnamon
sea salt
warm (not hot - just warm enough to melt/dissolve flavors) tallow
5. Combine
Add warm rice to the syrup.
Gently fold until each grain is glossy.
6. Add Seeds + Jujube + (optional) swt potato
Fold in sprouted pumpkin seeds + chopped jujube + optional steamed sweet potato.
7. Resteam to Integrate Flavor
White rice: 20 min
70/30 blend: 25–30 min
100% germinated: 30–40 min
Place Yakbap in a heat safe bowl and place in steamer. Cool to Warm (<110°F) & add Honey
8. Shape & Set
Press into a parchment-lined 7×5 pan.
Rest 1 hour at room temp, or refrigerate.
Honey & tallow naturally binds the mixture as it cools.
9. Slice & Serve
Warm knife under hot water
Dry fully
Slice cleanly
Soft, chewy, glossy — with every enzyme of raw honey fully intact. Best enjoyed with tea.
STORAGE: airtight in the fridge for up to 4 days.
Instant Pot Option (For a stickier texture)
Reheating YakBap After It’s Been Cooled
Yakbap reheats beautifully as long as you avoid direct heat.
Steam Reheat Option (Gives Best Texture)
Place your Yakbap pieces on a small plate or parchment inside your steamer.
Bring water to a gentle simmer (not a rapid boil).
Steam 5–7 minutes for room-temp Yakbap.
Steam 7–10 minutes for refrigerated Yakbap.
Remove, serve warm.
Stovetop Pan Reheat Option
(for people without steamers)
Put Yakbap in a skillet.
Add 1–2 tablespoons water to the side of it (not on top).
Cover with tight lid.
Heat on low for 4–6 minutes.
FAQ / Troubleshooting
LMK if you have any questions, I’ll answer them here!
What Rice do you use?
When we’re dealing with a flare-up, I use this 100% white rice.
When we’re simply trying to support over-all gut health, I use this Organic Germinated Five Grain Rice.
The taste and quality of both are absolutely phenomenal.
Code MUMWITHABUN gets you $5 off (Minimum purchase of USD49 required).
Rice is mushy. Help?
Some known causes of mushy rice:
Water level too high
Boiling too hard
Cheesecloth was too wet
Rice Layer was too thick
Rice is raw/hard in the center?
Rice grains were not soaked long enough
Steam cycle too short (make sure there is steam coming from the pot before you begin your timer)
Rice layer too thick (keep it at 1.5 inches max)
Heat too low - every stove is different so you may need to go a bit higher in heat than I did!
Gut-Friendly Korean Yakbap (Instant Pot Version)
This nourishing Yakbap skips the refined sugar, seed oils, and overheated honey—giving you a glossy, super chewy, low-inflammatory treat perfect for kids with eczema or anyone on a gut-healing journey.
Traditional Korean sticky rice dessert reimagined without soy, inflammatory seed oils, or refined sugars.
This version is everything you want from Yakbap—sticky, glossy, extra chewy, nostalgic—but rebuilt for gut health.
YakBap (약밥) is traditionally sticky, sweet, medicinal (due to the honey), & comforting—but modern/store-bought versions often rely on refined sugar, seed oils, soy sauce, artificial “honey,” and long-cooked syrups that strip nutrients and spike inflammation.
What Makes This Yakbap Low-Inflammatory & Gut-Friendly
Raw honey added after the rice cools below 110°F (preserving enzymes + medicinal benefits)
No seed oils — using grass-fed tallow instead
No refined sugar — kinder for blood sugar and eczema-prone skin
Coconut aminos instead of soy sauce — supporting hormone + thyroid health
Sprouted pumpkin seeds instead of pine nuts — allergy-friendly and mineral-rich
With Germinated Five-Color Rice Blend — easier digestion + better nutrient absorption
*White Rice or Organic Germinated Rice?
Choose your path.
Traditional YakBap uses white rice. It’s soft, comforting, and easy to work with.
But if you want:
lower inflammation
better digestion
more minerals
steadier blood sugar (major for eczema)
using organic germinated rice is a legit upgrade to consider. Because the grains are sprouted, they become easier to digest, lower in phytic acid, higher in antioxidants, and gentler on sensitive tummies—without losing the chewy Yakbap texture. It actually adds more of a deep nutty-profile without any nuts involved (;
Rice Options for This Recipe
100% White Rice — classic feel, softest texture + better for stomach flare up’s
1 ½ cups rice
100% Organic Brown Rice — highest nutrient density + best overall gut support
1 ½ cups rice
INGREDIENTS
Rice
1 ½ cups rice (see rice options above)
Warm filtered water (for soaking/souring)
1 tbsp raw apple cider vinegar (for white rice - no need to use it for germinated rice)
Warm Syrup Base (NO honey yet)
1.5 tbsp coconut aminos
1.5 tbsp grass-fed tallow (melted)
½ tsp Ceylon cinnamon
⅛ tsp sea salt
Water Ratios (Depends on your rice choice)
This is the part you absolutely need for success.
FOR 1.5 cups total rice (any type):
1.5 cups rice
1.5 cups filtered water
70/30 blend (white/germinated brown)
1.5 cups rice
1.75 cups water
1.5 cups rice
2 cups water
Add-ins
¼ cup sprouted pumpkin seeds
5 chopped jujube
100 g diced steamed Okinawa sweet potato (optional)
3 Tbsp raw honey — drizzled at the end
METHOD
1. Soak & Sour the Rice (Improves Digestion)
Rinse rice until water runs clear
Soak 4–6 hours with warm water + 1 Tbsp ACV
Rinse again
Drain well (drier rice cooks more evenly)
This step reduces phytic acid → easier digestion for sensitive bellies.
2. Make the Syrup (No Honey Yet)
Directly in IP bowl, whisk together in Sauté mode:
coconut aminos
cinnamon
sea salt
melted-but-warm tallow.
3. Build the Instant Pot
Inside the Instant Pot liner, add in this order:
You should have your warm syrup into the liner FIRST
Creates a natural non-stick barrier. Prevents the ominous “Burn” message from showing up on the screen.Add the water (based on rice option above)
Add drained rice on top — DO NOT STIR or pat down (it’s ok that it’s a little mountain)
Add sweet potato cubes on top (raw or pre-steamed)
Not stirring keeps the rice off the heating element → no burning.
4. Pressure Cook
Use the timing based on rice type:
White rice: 12 min high + 15 min natural release
70/30 blend: 18 min high + 15–20 min natural release
100% germinated: 22 min high + 20 min natural release
Open the lid once the pin drops.
5. Add Raw Honey
When rice is warm (not hot):
Stir in 3 Tbsp raw honey until glossy.
Keeps enzymes + minerals + vitamins intact + antioxidants alive.
6. Add Seeds, Sweet Potato and Jujubes
Fold in sprouted pumpkin seeds
Fold in chopped jujubes
Press into a parchment-lined pan
Cool 1 hour or refrigerate
Honey & Tallow naturally binds as it cools. Enjoy!
Traditionally Steamed Option: A bit more al dente than the IP version, still chewy & glossy — with every enzyme of raw honey fully intact. Best enjoyed with tea.
STORAGE: Store airtight in the fridge for up to 4 days.
Reheating Yakbap After It’s Been Cooled
Yakbap reheats beautifully as long as you avoid direct heat.
Steam Reheat Option (Gives Best Texture)
Place your Yakbap pieces on a small plate or parchment inside your steamer.
Bring water to a gentle simmer (not a rapid boil).
Steam 5–7 minutes for room-temp Yakbap.
Steam 7–10 minutes for refrigerated Yakbap.
Remove, serve warm.
Why? This method prevents drying, keeps it glossy + chewy, doesn’t scorch honey.
Stovetop Pan Reheat Option (for people without steamers)
Put Yakbap in a skillet.
Add 1–2 tablespoons water to the side of it (not on top).
Cover with tight lid.
Heat on low for 4–6 minutes.
FAQ / Troubleshooting
LMK if you have any questions, I’ll answer them here!
*What Rice do you use?
When we’re dealing with a flare-up, I use this 100% white rice.
When we’re simply trying to support over-all gut health, I use this Organic Germinated Five Grain Rice.
The taste and quality of both are absolutely phenomenal.
Code MUMWITHABUN gets you $5 off (Minimum purchase of USD49 required).